Monday 4 May 2015

Bibliography

Bibliography:

 ('The Beautiful Necessity, The Dark Side of Hair' (online)(8th March 2008) viewed 21st January 2015. 

 ('Early Victorian Era Makeup; Cosmetics and Embellishments'. Kate Tattersall, 2011, (online) viewed 21st January 2015, available from http://www.katetattersall.com/?p=3735)

(Victoria's Marriage, Wikipedia. Viewed 21st January 2015. Available from:  'http://en.wikipedia.org/wiki/Queen_Victoria#Marriage')

(Robert Harris, 20th December 2013, 'Elements of the Gothic Novel' (online), [viewed 21st January 2015], available from Virtual Salt)

(SparkNotes, 'Great Expectations:Context' (online), [viewed 28th January 2015], available from: SparkNotes.)

(Charles Dickens, 'Great Expectations' (paperback), Wordsworth Classics, (edition published:1992))
(Wikipedia, (online), 'Great Expectations 2012' [viewed 30th January 2015] available from: http://en.wikipedia.org/wiki/Great_Expectations_(2012_film)#Release)

(IMDB (online), Great Expectations 1998, [viewed 30th January], available from:http://www.imdb.com/title/tt0119223/)

(Wikipedia, Great Expectations 1999, (online) [viewed 30th January 2015], available from: http://en.wikipedia.org/wiki/Great_Expectations_(1999_film))

(Wikipedia, 'Great Expectations 1989', (online) [viewed 30th January 2015] available from:http://en.wikipedia.org/wiki/Great_Expectations_(miniseries))

(IMDB, 'Great Expectations 1981', (online), [viewed 30th January], available from: http://www.imdb.com/title/tt0196254/)

(Wikipedia (online), 'Great Expectations 1974' [viewed 30th January], available from: http://en.wikipedia.org/wiki/Great_Expectations_(1974_film))

(Wikipedia (online), 'Great Expectations 1946' [viewed 30th January 2015] available from:http://en.wikipedia.org/wiki/Great_Expectations_(1946_film))

(Wikipedia (online), 'Great Expectations (1934) [viewed on 30th January] available from:http://en.wikipedia.org/wiki/Great_Expectations_(1934_film))

(The Pragmatic Costumer, 'The Myth of a Myth: Brushing your Hair 100 Times', (online), 17th September 2014. [viewed 3rd February 2015] available from:https://thepragmaticcostumer.wordpress.com/2014/09/17/the-myth-of-a-myth-brushing-your-hair-100-times/) 

(Michael Warner, 'Victorian Hair' (online) [viewed 30th January 2015] available from: http://www.hairarchives.com/private/victorian1new.htm)

(Gothic Clothing, 17th February 2012, 'History of Gothic Culture and Fashion' (online) [viewed 21st January 2014] available from: Gothic Fashion)

(V&A, Victoria and Albert Museum, 'Gothic Architecture' [viewed 21st January 2015], available from: V&A)

(Joseph Mallord William Turner - Death On A Pale Horse - c.1825-1830.

(Sparknotes, 'Queen Victoria: The Years of Mourning' (online) [viewed 22nd February 2015], available from:http://www.sparknotes.com/biography/victoria/section5.rhtml)

(Elaine Furst, 7th February 2013, '10 Fascinating Death Facts from the Victorian Era' (online) [viewed 22nd February 2015], available from:http://listverse.com/2013/02/07/10-fascinating-death-facts-from-the-victorian-era/)

(Sarah C Nelson, 30th January 2013, 'Memento Mori: How Victorian Mourning Photography Immortalised Loved Ones After Death', [viewed 22nd February 2015], available from:http://www.huffingtonpost.co.uk/2013/01/30/memento-mori--victorian-mourning-photography-immortalising-loved-ones-death_n_2580559.html)

(History, 'Victorians and the Art of Dying' (online), [viewed 22nd February 2015], available from:http://www.history.co.uk/study-topics/history-of-death/victorians-and-the-art-of-dying)
(Kira Cochrane, 23rd December 2013, 'Ghost Stories: Why The Victorians were so spookily good at them' (online), [viewed 22nd February 2015], available from: http://www.theguardian.com/books/2013/dec/23/ghost-stories-victorians-spookily-good)

(Museum of the Macabre, May 14th 2011, 'Mary Todd Lincoln' (online), viewed 22nd February 2015, available from: http://macabremuseum.com/mary-todd-lincoln-and-spiritualism/)

(Paxton Price, 11th December 2011, 'Victorian Children in Victorian Times', [Viewed 22nd February 2015], available from: http://www.victorianchildren.org/victorian-children-in-victorian-times/)

(Bapen, 'Introduction to Malnutrition', (online) [viewed 19th February 2015], available from: http://www.bapen.org.uk/about-malnutrition/introduction-to-malnutrition?showall=&start=2)

(Shelagh Braley & Kate Clark, 'How Does Sunlight Affect Your Mood?' (online) [viewed 19th February 2015] available from: www.life.gaiam.com/article/how-does-sunlight-impact-your-mood)

(Delaware Academy, 'Film Continuity And The Make-up Artist' (online), [viewed 22nd February 2015] available from: http://www.delamaracademy.co.uk/the-make-up-artist/film-tv-make-up/makeup-continuity)

Pednaud, T. J. (2014) American Horror Story: Was Pepper Real? - Circus Freaks and Human Oddites. Available at: http://www.thehumanmarvels.com/american-horror-story-pepper-real/ (Accessed: 4 May 2015)

Who’s who in AHS Freak Show: the ultimate season 4 cast guide (2014) Available at: http://www.examiner.com/list/who-s-who-ahs-freak-show (Accessed: 4 May 2015)


Evaluation of Gothic Horror

Overall, I am really pleased with the progress I have made this year. From beginning the course, with no knowledge of Makeup and Hair, to leaving first year having completed these units, and being proud of the outcome. Gothic Horror has so far been my favourite unit, mainly due to the fact that I am a horror fan, and I haven't found it a task to research, I have enjoyed it. I am proud of both my Miss Havisham and Estella outcomes, as well as Quentin and Claudia. I have found working to both briefs easy and enjoyable, especially being able to manipulate the brief to create our own story for the characters. I feel in this unit, I have managed my time-keeping skills a lot better, which has resulted in me being less stress, and able to handle the work-load. The biggest difficulty I came across was when I was practising with the prosthetic pieces to create Quentin, and when they didn't stick to the face I became very stressed and frustrated. Rather than keeping with the prosthetics and creating a not-so-good outcome, I retraced my steps and began to think of other ways to create the same look. I have begun to think outside the box, creating original characters, and finding other ways to create horror without the blood. I am excited for what the next year of the course will bring, and am proud with how far I have come.

Moodboard for American Horror Story

This is my moodboard for American Horror Story: Asylum. I created this on Photoshop, using various tools. This, for me, represents the main themes in Asylum, Psychoticness, Demonic, Dark, and Desperation. I have used the woods as a background, to portray not only the setting, but the unknown that lies there. The woods could go on forever, or they could stop behind the next tree. I particularly liked how the forest created a cold, blue tone, which is harsh and send chills down your spine. I chose an image of a person wrapping their arms around their head, clutching at themselves in horror. The wide-eyed man, scared of the unknown, is another theme in Asylum. The patients are scared not only of themselves but the doctors who torture them, and the evil ex-Nazi who experiments on them. The next image is of the door, scratched by human nails. This represents the desperation the patients have to get out of the asylum, especially those who are wrongly institutionalised. The clutching hand is reaching out for help, but there is no one to hold him. The last image is of the demonic-looking character, who's skin is cracking off, revealing their inner self. I think this moodpboard accurately represents not only the setting, patients, or themes, but the emotions that are being faced in American Horror Story: Asylum.


Claudia Final Shoot.

These are my final images for Claudia. I am really happy with the outcome of my final shoot. I dressed my model in a plain, long-sleeved white tee-shirt, which I made a straightjacket from. The hair looks greasy and uncared for, from the water I sprayed her hair with. This is backed up by the dirt that is on her face and top, showing she is unclean. In these images, she has a slight smirk on her face, making her seem truly psychotic. 


Claudia Practise

This is my practice for Claudia. I am really pleased with the outcome of this, and will keep the makeup similar for my final shoot. 

Lucy Bowler - 19
Pale Skin with yellow undertones
Combination Skin
No allergies

Products:
Cleanser, Toner and Moisturiser. 
Kryolan UltraFoundation Palette
Illamasqua Skin Base
Illamasqua Translucent Powder
Coastal Scents Palette
Duo
MAC Satin
Fuller's Earth
Fake Blood
Water

Method:
1. Cleanse, Tone, and Moisturise the Skin.
2. Apply a light base, using the Kryolan UltraFoundation Palette and the Illamasqua Skin Base in White.
3. Set using the Illamasqua Translucent Powder.
4. Lightly contour the Face using the Brilliant Colour Palette, hollowing out the cheeks and the eyes. 
5. Work into the eye socket under the eye with a blue shadow (I used Coastal Scents), and grey from the Brillian Colour Palette. Blend out.
6. Line the eye with a red shadow, to recreate soreness. 
7. Apply Duo to the lips to recreate dry, chapped lips. 
8. Apply MAC's Satin to the cheekbones, and forehead to create sweat. 
9. Pat Fuller's Earth onto the face. This can be done roughly. 
10. With fake blood, create a few cuts to the face. 
11. Spritz the face with water, and the hair. 


I feel this is exactly how I wanted to recreate Claudia. I believe it really conveys Claudia's abuse, and psychoticness. I am really happy with this outcome, although I would like the hair to be more wet, to show the sweating a little bit more. 


Quentin's Shoot.

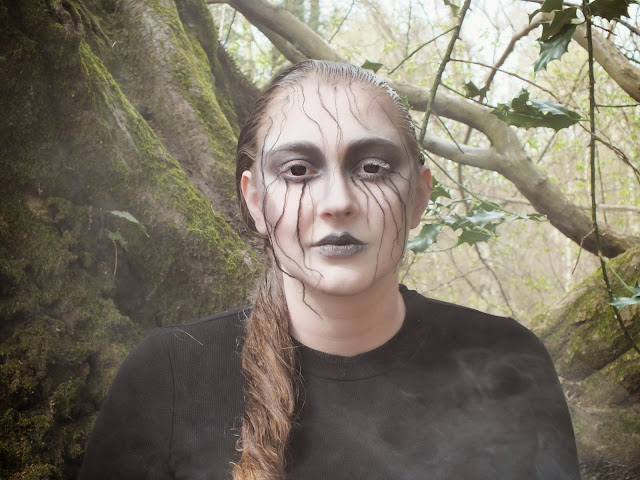
These are my final images for Quentin's Shoot. Luckily for me, I live very close to Ashridge Woods, where many films such as Harry Potter have been filmed. Prior to the shoot, I bought smoke bombs, as I imagined where Quentin emerges from the woods, it would be foggy and eerie. I dressed my model in all black, so that the focus would be on her face, rather than her clothing. I don't think an exuberant costume would have changed anything, as I feel it would take away from the makeup.  


These two unedited images are my favourite, as I feel I have captured Quentin's character well. He is the focus to both of the images, with the fog slowly smothering him. I feel I have followed the brief, as well as manipulating it to how I want it to be. I wanted to create an original look, and be horrific without having to use blood and guts. I believe that both the hair and makeup works together well, and that I have created an alien character, without having to use prosthetic pieces. 

Below are some of the other images I took on the day. I really like the images shot where the smoke is in the foreground, as it distorts Quentin as he is behind it. He appears as a figure, which I find quite eerie and uncomfortable as you cannot quite identify him. I shot from a range of angles and distances, in order to capture the true essence of Quentin. 


Quentin.

This was my final look for Quentin. I am really pleased with how my look turned out, after having to take a few steps back to rethink about the prosthetics. I believe the look without prosthetics looks better, simply due to how I have managed to create the illusion of high cheek bones, as they're so smooth and straight. I worked on a light base, using the Brilliant Colour Palette to contour, and colour around the eyes. I am happy with the blending around the eyes and the nose, making the face look deeper and more shallow in various places. 

Consultation
-Laura Day
-19
-Pale, Freckled Skin
-Combination Skin
-No Allergies

Products:
Cleanser, Toner, Moisturiser
Smashbox Photo Finish Primer
Kryolan UltraFoundation Palette
Illamasqua Skin Base
Illamasqua Translucent Powder
Kryolan Blush Palette
Kryolan Brilliant Colour Palette 
Masking Tape
Illamasqua Reflections Palette
MAC LipMix Black
Black Wool
Duo
Black Contact Lenses

Method:
1.Cleanse, Tone and Moisturise the Skin. 
2. Prime the Skin with the Smashbox Photo Finish Primer. 
3. Mix a light base using the UltraFoundation Palette, and Illamasqua Skin Base in White. 
4. Powder with Illamasqua Translucent Powder. 
5. Apply masking tape to the cheekbones, then begin to work into the cheekbones with the Brilliant Colour Palette, and Kryolan Blush Palette. Build up the colour. 
6. Remove the masking tape to reveal a sleek line on the cheekbone. 
7. Work into the edges of the forehead, nose and eye sockets with the Brilliant Colour Palette.
8. Use Illamasqua Reflections Palette Black Shadow to make the eyes darker. The colour should conceal the brows. 
9. Apply MAC LipMix in Black to the lips. This should be patted on using a finger, to create a distressed look. 
10. Apply White from the Brilliant Colour Palette to the tops of the cheekbones, above the brows, ridge of the nose and jawline. 
11. Apply Skin Base to the Lashes.
12. Tear apart black wool into small strips, varying in length and thickness. 
13. Using Duo, apply a small amount to each end, and stick onto the face from the forehead down, and from the bottom eyelash line. 
14. Finish by putting in black Contact Lenses.
15. Brush through the hair, ensuring there are no knots. 
16. Apply Gel, starting at the hairline, and combing through the hair. 
17. Twist the hair together, and let it fall over the shoulder. 


I am really pleased with the final makeup look for my representation of Quentin. I feel the makeup contains a sense of demonic possession and darkness, as well as very much alien. By slicking back her hair, it makes my model's head shape very prominent, and you are drawn to the eyes which are staring back at you. The wool creates vein like structures that squirm across her face, seeping black darkness into her skin. It seems that the wool is coming from her hair, and seeping from her eyes, which I am really happy with this effect. I am proud of the contouring, as originally I was going to use prosthetic pieces on the skin to raise the cheekbones, but I feel I have accomplished this without this. The eyes draw the viewer into them, because of their sheer darkness. I really enjoyed creating this look, as I am fascinated by horror and darkness. This was much more of an activity I enjoyed rather than a task. 


Practising with Prosthetic Pieces


Before I completed my final look, I wanted to practise with the prosthetic pieces, to create harsher cheekbones and brows. Unfortunately, this didn't work for me. I bought Cinewax and Clear Latex from Kryolan, but I had issues with the wax sticking to the cheekbones. Looking back, spirit gum would have helped it to stick, but I hadn't thought about it and didn't buy any. Every time my model would move her face, the wax would come unstuck to the cheekbones. Once I had finally stuck them down, it was difficult to smooth it. My look is very sleek and smooth, and once the latex was on, it became uneven and bumpy, and really obvious that I was using prosthetic pieces. 


Now I had to rethink what I would do. I decided that I would remove the prosthetic pieces from the face, and just work into the cheekbones with makeup, and contour the skin as much as I could. 

Claudia Hair Charts

Claudia Hair Charts
1. This is my initial hair chart. After researching, many patients had their hair shaven, which this design is based on. I would have to either get a model with short hair, or I will have to find a wig/bald cap which will look the same. 

2. This hair design is for someone with long hair. Preferably I would have my model with black hair, to make this look more sinister. For all of my designs I have to keep them simple, as Claudia would not be open to having any haircare or products. For this look, I can obtain clip-in fringe to create it. 


3. This design is similar to the 2nd, although it is based on a middle parting instead of having a full fringe. For this, I would spritz her hair with water, to create the look of sweat. Her hair would fall down the sides of her face and look uncared for. 


4. This design is for the same makeup look. The bandages would cover the hair, with bits coming out in various places. This look is very sinister. 


I have decided that number three will be my final hair chart design. I am looking forward to creating this look, as I can use some fuller's earth to make the hair look dirty too, as well as the face.


Claudia Face Charts

Claudia Face Charts
1. This was my initial face chart for my character Claudia. I wanted to portray her psychotic tendency, so have decided that she will have scratched all of her face, during her time in her cell. She will be covered in mud, which I can use fuller's earth to create. I want to create a 'no-makeup' look, as in an asylum, she would not have access to any cosmetics, so her base would have to be really natural and clear.

2. This look is less realistic, but more sinister. Claudia would have a bandage wrapped tight around her head, and across her mouth, leaving just her eyes and nose bare. The base would once again be very natural, and dirty. I imagine Claudia to be very exhausted, so her eyes would have dark circles underneath. 


3. I have chosen this look to be rugged, dirty and uncared for. Her eyes would be sore and tired, her face would be dirty and unclean. Claudia is not cared for by any of the doctors and nuns at the asylum, and I wanted to portray this. This is the more subtle look, very natural and believable. 


4. This is my final look. This design is a more enhanced and exaggerated look of 3. I have made her eyes more sore with red, her eyes more tired with heavier bags underneath. She would be dirty which I can recreate with Fuller's earth, sweat I can recreate with Vaseline, and water spray, and cuts in various places. 


I have decided that face chart 4 will be my final design, as I want the look to be very sinister, and the viewer to not be sure whether to be scared or feel sorry for Claudia. I am really excited to complete and practice the look. 

Quentin Hair Charts

Quentin Hair Charts
1. As Quentin could be either a man or woman, the length of the hair did not concern me. I have decided that I would like to use a female to model for me as Quentin. This will challenge me, as I need to make her look gender-less. This face chart is using the models own hair, and slicking it back. Once slicked back from the head, I will then twist the hair downwards over the shoulder. By having all of the hair greased down, it will enhance the shape of the head and make it more alien-like. 

2. The second design I have completed features a simple middle parting, greased down, behind the ears. I find this look quite sinister, and is often used in the movies to portray a character that is dark. I don't think I will use this look as my final hair design, due to the fact that it is often used. 


3. My third design would be using a bald cap to create the look. By making the model bald, would enhance the shape of the head, and have all the focus on the facial features of the model. 


4. My fourth design would be slicked backwards down the head, with excess hair at the bottom of the head slicked down the neck. With all of my designs, it is about making the shape of the head prominent, which makes the viewer focus on the facial features.


The design I have chosen to use is the first, as with a female model I think it will be most effective. 

Quentin Face Charts

Quentin Face Charts
1. This is my first design for Quentin. I wanted to use cooler tones, to create an alien-like look. I feel this face chart is too obvious, and unoriginal. The stripes coming down from the forehead is used quite a lot when creating alien looks, and looking back on it I am not very happy with this face chart. I feel I could have made this look more interesting, but it was good as a starting point as I could then work from this, taking aspects and changing them.
 2. This is my second design. I really like this design, I feel this could be a really eerie look. By having a really pale base, and using subtle, cool, blue tones to contour would make the character look unliving but not dead. The character looks detached from humans, and by using cold tones rather than warm tones usually seen in the skin's complexion, this enhances this concept even further. I am happy with this design, I would have to paint the whole of the model's body for this to work. Doing something with the eyes may make this look even better, I am considering using white contact lenses.
 3. This is my third look for Quentin. I imagine Quentin very demon-like, and very dark and horrific. With this face chart, I would have Quentin's hair sprayed back and slicked back, and then the black seeping down his face, to convey the darkness sweeping over him. I would use SupraColour, and sponge it as it blends into the bottom half of the skin. I would have to be really careful not to smudge it, and create too many grey tones, I feel this look would only work if there was clean black at the top of the head. I would use this technique on the arms as well, starting with black at the fingers and blending up the arm.
4. This is my final face chart for Quentin. For this look, I would concentrate on using white, black, grey and a warm grey to contour the skin highly. I would use prosthetic pieces on the cheeks, and the eyebrows, to manipulate the facial structure. I need to practice this, to see if it would work in the way I would want it to. It would have to be smooth and sleek, as if it was bumpy and rough, it would ruin the look. I would contour the skin to within an inch of it's life, using tape to create a harsh line around the cheek bones. The eyebrows will be hidden, making the model look even more alien like. I have decided that over the contouring, I will have wool stuck down the face, like veins. It will come from the hairline, and the eyes. The eyes will have to have black contact lenses on, to convey the inner demon. 


Out of all of my face charts, I have decided to use the 4th and final design. I feel this design, will work the best, and convey the character that I want to. I wanted to create something completely original, and scary at the same time, which I think with this design I will be able to do.